Showing posts with label snacks and starters. Show all posts

Friday, 14 December 2012

Brussels sprouts puree


Have to say I am still in love with "Hugh's Three Good Things (on a plate)". I have a feeling this is probably my first cookery book from which I will use every single recipe. It will take some time but I will eventually. This is a recipe for brussels sprouts puree that goes really nicely with black pudding and bacon - I tried the exact recipe from the book and it is fantastic. I have also tried it with some roast pork and potatoes and this is a lovely take on a side veg. If you are brussels sprouts lover you will also enjoy it on a toasted bread or straight from a food processor - like I do.

I have good news for those who are not fans of the bitterness typical for this vegetable - this puree is quite sweet, I recon due to the onions and cream and tastes almost like a pea puree.      


Serves 2-3 

250g brussels sprouts
25g butter
1 medium onion or 2 shallots, peeled and diced
2 garlic cloves, peeled and finely chopped
50ml double cream
salt 
freshly ground black pepper

Trim the sprouts and crisscross on the bottom - this will help to cook them more evenly and quicker.

Heat the butter in the pan and fry the onions for about 10 minutes over a low heat - until soft but not browned. Add the garlic for the last 2 minutes of frying. Then place in a food processor.

Bring a pan of water to the boil, add some salt and boil the sprouts until tender then drain and place into the food processor.

Add the cream, little salt, some freshly ground black pepper and puree. I like it quite coarse, but you can make it smooth.

It is suitable for reheating in a non stick pan, but unfortunately it looses its colour.

Saturday, 8 December 2012

Marinated beetroot carpaccio with rocket & horseradish mackerel


Beets & horseradish.

Horseradish & mackerel.

Beetroot, horseradish & mackerel.

I know perfectly well this lovely combination and have to say this is one of my favourite ever, so this time I am presenting an elegant starter using this well known combination of flavours. I served it recently for a supper to our friend who really enjoyed this combination and mentioned that probably most of the local farmers would be very unhappy if I served them raw beets. These in a fact are marinated, crunchy and zingy as ever. By marinating they loose some of their earthiness, that some people find unattractive.


serves 4

4-5 medium beetroots, peeled and sliced into very thin slices
4 tbsp of red wine vinegar
8 tbsp olive oil
2 level tbsp sugar
200g smoked mackerel fillets, skin removed, flaked into chunks
3 tbsp of freshly grated horseradish
juice of one small lemon
salt
freshly ground black pepper
4 small handfuls of rocket
little poppy seeds

Place the vinegar, 2 tbsp olive oil, sugar and little slat in an airtight container. Add the sliced beetroots, cover and leave it in a cool place for minimum 12 hours, preferably 24 hours. Shake the box every few hours so the beets are getting marinated evenly. 

In a second box mix the remaining olive oil, horseradish, lemon juice, some salt and pepper and mix well. Next add mackerel pieces, mix gently so you don't break up fish too much and cover. Leave it in a cool place for minimum 12 hours, preferably 24 hours.

Before serving remove bring it to the room temperature - I kept them in warm kitchen for about 1 hours before serving.

Drain the beets from the marinate and place on the plates in one layer, overlapping. Place small handful of the rocket and some mackerel in the middle. Drizzle with horseradish olive oil left from marinating the fish. If there is not enough left add some extra lemon juice and olive oil into the box and mix well.

Sprinkle with some poppy seeds and serve with good bread.

Tuesday, 4 December 2012

Roast aubergine & walnut pâté (no garlic!)


I love, love, love aubergine dips and pâtés. Unfortunately all of the recipes I have been through contain garlic and as much as I love garlic I am unable to eat it during the day - I don't want to stink in the office - as simple as that. So this is my take on aubergine pâté without the garlic but still very aromatic and rich. Hope these who don't like garlic or like me can't eat it all day long will find this recipe interesting.   

 makes about 250ml

2 medium - smallish aubergines, halved and sliced into 1cm slices
1 shallot, peeled, halved and sliced
handful of walnuts
handful of fresh parsley
juice of whole lime
1 tsp of tahini paste (I used dark one)
pinch of chilli powder
¼ tsp of turmeric
½ tsp of ground cumin
½ tsp of ground coriander
extra virgin olive oil
salt
freshly ground black pepper

Heat the oven to 180 C.

Place sliced aubergines in a bowl and drizzle with little olive oil, add some salt and pepper. Mix well so the vegetables are covered in oil. Place onto a baking tray or in ovenproof dish and then place in the oven. Roast for about 25 minutes, then turn the oven off, open it's door slightly and leave the aubergines to cool down.

Heat the frying pan without any oil and dry roast the walnuts until slightly browned and fragrant. Place in a food processor.

Using the same pan fry the shallots in little olive oil over a low heat until soft, then place in a food processor. 

Now to the food processor add aubergines, shallots, turmeric, parsley, tahini, chilli, coriander, cumin, lime juice and some salt and pepper. Mix and at the same time add little by little olive oil. I like it bit chunky with some aubergine skins still visible and also with pieces of walnuts, but you can make it extra smooth - just mix little but longer and using a spatula scrap down the dip from the food processor as you go.


Season with salt and pepper accordingly to you taste, place in airtight container and place in the fridge, preferably leave it there overnight, or at least couple of hours. This will allow the flavours to mingle.

Serve in room temperature, garnished with some chopped parsley.

Thursday, 8 November 2012

Cream of butternut squash & sweet potatoes with hazelnuts and crispy sage


Definitely the best one I have ever made. Not fabulously bright orange in colour, as I caramelised the edges of the vegetables to get this really deep flavour. And this I guess, is the secret of this soup and what makes it really fantastic. Sage, pumpkin, nuts - such a classic combination.


Serves 2-4

300g butternut squash, peeled, seeds removed and flesh diced into about 2cm cubes (weight after peeling and de-seeding)
300g sweet potatoes, peeled and diced into about 2cm cubes (weight after peeling)
2 garlic cloves, unpeeled
pinch of freshly grated nutmeg
pinch of chilli powder
5-6 tbsp olive oil
1 large shallot, peeled and diced
about 900ml vegetable stock
handful of whole hazelnuts
about 8-12 whole sage leaves
salt
freshly ground black pepper

Heat the oven to 180C.

Place the butternut squash, sweet potatoes, garlic in an ovenproof dish and drizzle with 2 tbsp of olive oil. Sprinkle with little nutmeg, chilli, salt and pepper and roast until potatoes and squash are soft and caramelized on the edges. Remove from the oven and leave it to cool down, You can roast the vegetables night before and refrigerate them. I did it because I was baking something else and had preheated oven - it saves time and energy. 

On a low heat fry the shallot in a pan in 2 tbsp olive oil for about 10 minutes, until soft. Add roasted vegetables, and squeeze the garlic out of its skins and add to the pan. Stir and add the stock. Bring to the boil and simmer for about  3-5 minutes. Remove from a heat, liquidise with a hand blender and then sieve the soup using a fine sieve and ladle - this will make it even more smooth and make sure any unpleasant bits will not end up in the soup. Season with salt and pepper.

Fry the hazelnut on a dry pan until slightly browned then remove from a pan, place on a chopping board, leave then to cool down slightly and chop roughly.

Using the same pan heat the remaining olive oil and fry whole sage leaves for about one minute, until crispy.

Place the soup in a serving bowls/soup plates, sprinkle with the hazelnuts and top with few sage leaves. Drizzle with little of the sage oil. Serve with good bread.

Wednesday, 31 October 2012

Bread, onion & cabbage bake


Cabbage again. This is my typical veg for Autumn-Winter time, and apart from being filling, tasty and comforting it is also on the cheaper side.

I cooked this dish according to a recipe from my new favourite cookbook (well, didn't follow the exact quantities). This is something that my Polish soul fell in love with immediately, but I also came across Italian inspired recipe for soup using very similar ingredients. 


I prepared two versions, one vegan for myself and other with some extra bacon - for my hard working partner. This however is meat free version and you can adjust it accordingly to your preferences.

Swaps? Use kale or Swiss chard instead of a cabbage.

Extras by Hugh? A sharp cheese such as mature Cheddar or Gruyere sprinkled on each layer of bread would be nice addition and make this more filling.

Extras by me? Add fried bacon cubes to the cabbage or sprinkle the dish with bacon on a plate.


Serves 2-4

8 tbsp olive oil
3 medium onions, peeled and diced
2 garlic cloves, peeled and finely chopped
1 medium cabbage, quartered, core removed, cabbage shredded into about 1cm slices 
half French baguette, robust, good quality, stale (or sourdough bread) cut into about 2cm cubes
400mlhot vegetable stock
salt
freshly ground black pepper

Fry the onion in 4 tbsp olive oil on a low heat for about 15 minutes. Then add garlic, cover and cook for about 10 minutes, stirring occasionally.

Boil a bog pan of water, add some salt and the cabbage, cook for about 4 minutes, then drain and leave it to steam for a while. 

Place diced bread in a bowl and drizzle with the remaining olive oil. Season with salt and pepper and set aside.

Heat the oven to 180 C.

Layer the ingredients in an ovenproof dish starting with onion, then bread and cabbage. The number of layers depends on how deep your dish is, I only managed to get two layers of each ingredient. Make sure you top it up with layer of bread. Add little salt and pepper between each layer. pour the hot stock over the dish making sure the bread cubes on the top soak some of it. Cover with kitchen foil and place in the oven. Bake for about 30 minutes, then uncover and bake for further 15 minutes or until golden on the top and stock has nearly evaporated. Remove from the oven and leave it to rest for about 10 minutes, then divide into portions and serve.

Tuesday, 30 October 2012

Red cabbage with black pudding, apples & hazelnuts

Recent recipe, so sorry I am late again with English version, two more to come that should have been done ages ago and every so often I wonder if I should stop writing this blog. :/

***

This is a recipe from some ancient "Good Food" magazine and today I am not even entirely sure if this is exactly how I should have made it. I also wasn't too sure if it looked good enough to photograph it. As much as I love the ingredients and these all seemed like a perfect harmony to me, when I plated this dish I thought to myself: what a mess. I took photographs, we sat and ate our dinner, really enjoyed it and after couple hours I went back to my computer to see the photographs and decided I was too harsh at first. Considering this is a cabbage dish and they never look in as fantastic as some Michelin starred and styled ones (well not in my kitchen anyway!) this is actually quite attractive looking one. It is surly great Autumnal dish whether you like the way it looks or not, you should try it.  


Serves 2-4

1 small red cabbage, core removed, cabbage shredded not too finely
2 small sharp apples, peeled, cored and cut into chunks
4 bacon rashers (I used smoked streaky)
4 slices of black pudding
handful of hazelnuts
pinch of brown sugar
1 tbsp of sunflower oil
1 tbsp of butter 
1 tbsp cider vinegar
2tbsp olive oil
1 level tbsp wholegrain mustard
1 tsp of honey
salt
freshly ground pepper

In a large pan heat the oil and add shredded cabbage with little salt, stir fry for about 5 minutes and then add 3-5 tbsp of water, stir, cover and simmer for about 3 minutes. Remove from the heat and leave covered so I doesn't cool down too much.

Prepare the dressing. Whisk olive oil, cider vinegar, mustard, some salt and pepper in a bowl, then set aside.

Dry roast the hazelnuts in a frying pan until slightly browned and then set aside on a chopping board. Chop roughly and leave them to use later.

In the same pan fry bacon witout adding any extra fat until browned and crispy. Move the bacon on the side of the pan (or just spoon it out, I didn't want to use another dish), and in the bacon fat fry black pudding slices - British black pudding needs about 2-3 minutes each side.

Meanwhile in another pan melt the butter, add apples and sprinkle with sugar. Fry until slightly browned, caramelised on the edges (about 5 minutes).

Place warm cabbage into the bowl with the dressing and mix. Adjust the seasoning - add some salt and pepper if required. Divide between warm plates, sprinkle with bacon, add caramelised apples and top with slices of black pudding. Sprinkle with chopped hazelnuts. 
You can serve it as a starter or like us add some potatoes roasted in duck fat and eat it as a main course. 

Tuesday, 23 October 2012

Steak tartare


This is something that I remember from my childhood, very popular party dish when I was a kid, for adults quite often served with a shot of very cold vodka. Couldn't quite grasp why people would eat raw meat, but once I got older I actually started to enjoy it. I think it was at least eight years since last time I ate it and then suddenly I had cravings for this dish last week.

Many Polish cooks would just mince fillet of beef. For me this is a crime. It is quite pricey, and by mincing it you destroy it's delicate texture. You may as well get cheap cut of lean beef and mince it, why do it to expensive fillet? Honestly I don't get it. So chop it finely, yet to the stage when you can still feel some texture under your teeth. Secondly, traditionally in Poland people would use onion, for me onion has too strong flavour and can overpower the flavour of beef. I use more subtle shallots. I would normally use diced pickled mushrooms but these are difficult to get hold of where I live, so I skipped them. I added cornichons and capers. I would advise to not to use strong flavoured oil, but something with a delicate flavour, mild olive oil or rapeseed oil. To enhance the beef flavour it is good to add some anchovies, and my last word: I never use mustard - I think it kills the meat flavour.  


So this is my take on this traditional dish.


Serves 2 

about 300g fillet of beef
1 small shallot (I used French variety, if British you need two)
2 medium cornichons (gherkins)
2 tbsp of salted capers
1 tbsp olive oil
2 small egg yolks (you can use quail eggs) 
4 anchovies (tinned or from a jar)
freshly ground black pepper
salt

Slice beef fillet into about 3mm slices and then chop into small dice. You can go again with a knife over the chopped meat, but do it roughly. Add minced anchovies (mince it with a side of a knife or a fork), some pepper and mix, adjust the saltiness by adding some salt according to your taste, but remember this dish will get more salty when you mix it with capers.

Peel the shallot and dice finely. Dice the gherkins and rinse the capers thoroughly under a running water then drain and chop roughly.

Place cooking ring on a plate and place one layer of meat then one layer of gherkins or caper or shallots, then again layer of meat and layer of next ingredient. Finish off with a layer of meat and make a little well in the centre. Gently place egg yolk in the well and sprinkle with some pepper and salt (optionally). Make sure you save some gherkins, shallots and caper for the finishing touch.

Using oil make three lines across the plate and place some gherkins, shallots and capers in each line. Remove the ring and serve immediately with good bread and optionally with a shot of good quality very cold vodka.

Tuesday, 11 September 2012

Soup. Roast tomatoes, onion & pearl barley

 
I still go through my new cook book and even I had different culinary plans for this month for the last two weeks I have been writing my shopping lists with this book in my other hand. And to be honest - I don't mind this at all!

I already showed you some salads, breakfasts and now I think there is a good time for something warm and hearty, for example a soup. With minimum ingredients, little effort but maximum flavour and satisfaction.

Hugh recommends good chicken or beef stock, I had homemade vegetable stock and I would not swap it for meaty stock, but this is my personal choice. You can also use ready made passata (fresh tomato puree) but in my opinion passata made with roasted tomatoes it absolutely the best and it is well worth making an effort of preparing it. I made mine night before as well as the stock, so next day preparing this soup took me about 30 minutes.

Swaps? Use spelt or short grain rice instead of pearl barley. However for me the barley is what makes this soup special. 

Plus one? Add some Parmesan shaving on the top just before serving. 

Dinneeeeeeeeer's reaaaady!


Serves 4

2kg ripe tomatoes, halved
5-6 tbsp olive oil 
few springs of fresh thyme
2 bay leaves
3 garlic cloves, peeled and finely chopped
750ml vegetable stock, hot
150g pearl barley, rinsed
1 large onion, peeled and diced 
salt
freshly ground black pepper
some extra virgin olive oil for drizzling (optionally)

Heat the oven to 180C.

Place halved tomatoes in an ovenproof dish, sprinkle with chopped garlic, add bay leaves, thyme springs and drizzle with 3 tbsp olive oil. Place in the oven and roast for about an hour. Tomatoes should be soft, little wrinkly and start to caramelise on the edges. Remove from the oven and set aside to cool down. Them place in the sieve and using a ladle press all the juices. There should be only skins and peeps left on the sieve and you should get around 500-700ml of passata. 

In a pan heat 2-3 tbsp olive oil and fry the onion for about 10 minutes, over a low heat until softened. Next add the barley and mix until covered in fat. Add hot stock, passata and simmer for about 30 minutes or until the barley is cooked. 

Divide between serving plates/bowls and before serving drizzle with some extra olive oil. Serve with a piece of good bread.

Friday, 7 September 2012

Beetroot, apple, pecans

I look at this plate and see Autumn. It looks like somebody just painted this plate with these lovely colours. I love the way this dish looks and how it tastes. I ate all of this, even this was enough to feed two for a starter or a snack. Even I am not allowed to have mustard, vinegar and really shouldn't eat too much raw apples. But you know what? It was bloody worth it and tomorrow (ups!) I am going to do it again.

This is another recipe from a book I was talking a lot recently and review is still to come.

Raw beetroot has an earthy taste and smell, almost peat like. Fresh apple perfectly cuts this earthiness and on the top there are crunchy nuts. Add a splash of good dressing and you have the perfect trio.

Hugh's tips:

Extra one? Add some Cheddar cheese.
Extra two? Serve it on a bed of crispy lettuce (or other leaves).
Swaps? Use firm pear instead of apple and/or walnuts instead of pecans. This would go lovely with blue cheeses instead of Cheddar.

My tip: walnut oil will make lovely dressing too!

How would I possibly not love this book?


Serves 2-4

2 firm, sweet apples
2 medium beetroots
100g pecan nuts
1 tsp English mustard
1 tsp cider vinegar
3 tbsp extra virgin olive oil
freshly ground black pepper
salt

Again it would be helpful if you have a mandoline. 

Quarter the apples and get rid of the cores. Then slice into thin slices and place in a bowl.

Peel and quarter beetroots and slice into thin slices. Place in the bowl with the apples.

Dry roast pecans in the hot pan until slightly browned, but not burnt.

Mix mustard, olive oil and vinegar with a pinch of salt and some pepper. Pour over the vegetables, mix gently and divide between serving plates.

Sprinkle with some pecans and serve immediately.

Wednesday, 5 September 2012

Cauliflower, tomatoes, capers

This is the second dish I tried from my new book "Hugh's Three Good Things" by Hugh Fearnley-Whittingstall. Think: crunchy cauliflower, sweet tomatoes and sour sharp capers. Optionally some parsley. In my humble opinion one thing must go with this salad: crusty bread to wipe off those delicious juices. Another quick one before I publish book review. 

I didn't follow the exact quantities and also following Hugh's general guidelines from this book (about extras, swaps etc) I would recommend  you swapping blanched cauliflower for raw one and decide which one you like better. I equally like both.


Serves 2

1 small cauliflower, trimmed into florets 
3 medium ripe tomatoes 
40g salted capers, rinsed 
olive oil 
half lemon juice 
freshly ground black pepper 
salt 
some chopped parsley (optionally)
good quality bread for serving 

I prefer to skin tomatoes, but I can skip this stage. Place tomatoes in a bowl and cover with hot water. After about 5 minutes drain and remove the skin. Quarter, remove the flesh with the seeds and hard ends then chop to your liking. 

Bring a pan of salted water to the boil. Add cauliflower florets and cook for about 2 minutes, then immediately drain and put into a bowl with icy water - this will stop them from cooking. Leave to cool down completely and drain. Place in a bowl. 

Add tomatoes and capers to the cauliflower, add a good splash of olive oil, lemon juice, little salt and some pepper. Toss and leave to macerate in cold room temperature, for at least 1 hour, preferably for 3 hours. 

Serve sprinkled with some parsley and with some toasted bread. 

Sunday, 2 September 2012

Sourdough bread, olive oil, honey


I have a feeling not many of you have tried this combination, even I am sure most of you have all the ingredients at home all the time.

On Tuesday I have received bran new book called "Hugh's Three Good Things" by Hugh Fearnley-Whittingstall. I am going to write a review shortly, but first let me show you few recipes from this book that I have already tried. 

This was my Saturday's breakfast. Crunchy, sweet, salty and little bit sour.


few slices of good quality bread (preferably sourdough, I used wheat sourdough with a hint of rosemary)
good quality extra virgin olive oil (I used olive oil from Ginestra, with low acidity and scent of artichokes)
coarse sea salt or flaked salt
honey


Toast or grill bread to your liking.

Drizzle fairly generously with olive oil and leave for a minute to soak in.

Sprinkle with some salt.

Drizzle with some honey.


That's it. So little and so much. I died and found myself in heaven.

Hope you'll enjoy it, have a lovely Sunday!

Friday, 24 August 2012

Oven baked sweet potato crisps (with herbs & smoked salt)


Probably in last ten or twelve years (or maybe longer?) I haven't been a big fan of potato crisps. I use to like them a lot, but then after one of my best friend's birthday party that I have spent mostly on my knees embracing a toilet and getting those chips back from my stomach... Never mind. The point is - I never touched them since. And just to make it clear - I had one beer and I think it must have been not exactly fresh one...

I tried them again when I moved to UK, because the idea of vinegar flavour was so intriguing, that I could not resist. Now I have to say I like them a lot, try not to eat them very often, probably small packet or two a year when I have cravings. What I like even more are vegetable crisps. There are few on the market that have a decent mixture of nice vegetables such as carrots, sweet potatoes, parsnips but none of those are baked. 

Therefore I made an attempt to my own oven baked crisps. Sweet potato is probably one of my favourite bites from whole selection of vegetable crisps, so I decided to start with this veg and hopefully will be more to come. Perhaps even my own homemade selection of baked vegetable crisps? It would be good not to depend on the shop bought, deep fried. We'll see!


Makes bowl enough to 2-4 for sharing 

2 large sweet potatoes, unpeeled, washed 
3-4 tbsp olive oil 
few small springs of fresh thyme and rosemary
smoked, flaked salt 

Using a mandoline slicer is essential. Potatoes should be cut into same thickness otherwise baking them will be problematic. I cut them into about 1.5mm slices.

Heat the oven to 150C (fan). Place the potatoes in one layer onto a baking tray. You don't have to, but you can very lightly oil the tray before putting the potatoes on, but I once tried to bake them without oiling the tray and probably one out of ten didn't want to come off (I used knife), but otherwise they were OK. It depends how much oil you want to use in this recipe. Oil on the tray helps to get them crispier - that is sure.

Chop the herbs and mix with the remaining oil, then brush the top of the potatoes, sprinkle with some salt and place in the oven. Now the tricky bit - because they are of different size some of them will be ready after about 25-30 minutes. They will be curled up on the edges, lightly browned and crispy. Remove them from the oven and place on the wire rack. When the cooled down, check larger crisps - they probably will need some more time in the oven - the centre will be still quite chewy. Turn the temperature down to about 100C and return them to the oven on the same baking tray (no oiling required). Bake until crispy. This, depending on the size and thickness of the slices, should take about 20 minutes. Remove from the oven and cool down. Place in a serving bowl and enjoy. 

They are very hygroscopic, which means they absorb moisture very easily and quickly, so better not to store them, but eat straight away. Or, if they are bit damp and chewy in orded to make them more crispier return them to the oven and be careful not to burn them.


Wednesday, 6 June 2012

Summer dinner & please keep your fingers crossed!

Summer dinners can be so light and easy to make especially if you are lucky to live in a place where temperatures are more likely to remain you summer rather than late autumn. Summer dinner for me are vegetables and sometimes something extra such as egg. 

 This is my last recipe before taking a short break. I am going to take this break because I want to focus on something else for a little while. I want to focus more on myself. I was selected from many girls and invited to a casting for new project of the British company offering underwear and clothes for woman who have large breast and curves. I am not even dreaming about getting this job but I would love to do my best at the bra-fitting, interview and photoshoot on 19 June so please, please keep your fingers crossed. This does not mean that I am going to go on the diet and try to loose some weight. No way! I am just trying to eat well for my skin, I want my eyes to be sparkling and my mind to be calm and focused therefore I need some time just for myself, not for searching new recipes, spending time cooking and photographing. I hope you will understand and wish me luck. I will be back with new ideas and new energy - I love challenges and getting new experience so I am sure no matter what the result will be I will get more positive energy. 

And now please enjoy one of my favourite summer dinners. Peas with mint, asparagus, pancetta and poached egg.


Serves 2

about 500g garden peas (fresh or frozen, if frozen defrost it in the colander)
10 green asparagus spears, wooden parts removed, each spear halved 
10-12 thin pancetta rashers
1 tbsp olive oil  
2 eggs
salt
freshly ground black pepper 
handful of fresh mint leaves, roughly chopped

Fry the pancetta rashers in dry pan and set aside. Using the same pan fry the asparagus in the olive oil for about 4 minutes then add the peas and fry for about 2-3 minutes until just warm but still bright green and firm. Next add fresh mint, mix well and divide between two warm plates.

In the meantime crack the eggs into two small separate bowls, boil some water in a small pan and add some salt. Remove from the heat, add the eggs and place back on the heat. Boil for about 90 seconds. Drain the egg gently, using a slotted spoon.


Arrange fried pancetta on the plates with vegetables and top with the poached eggs. Serve immediately.

Monday, 7 May 2012

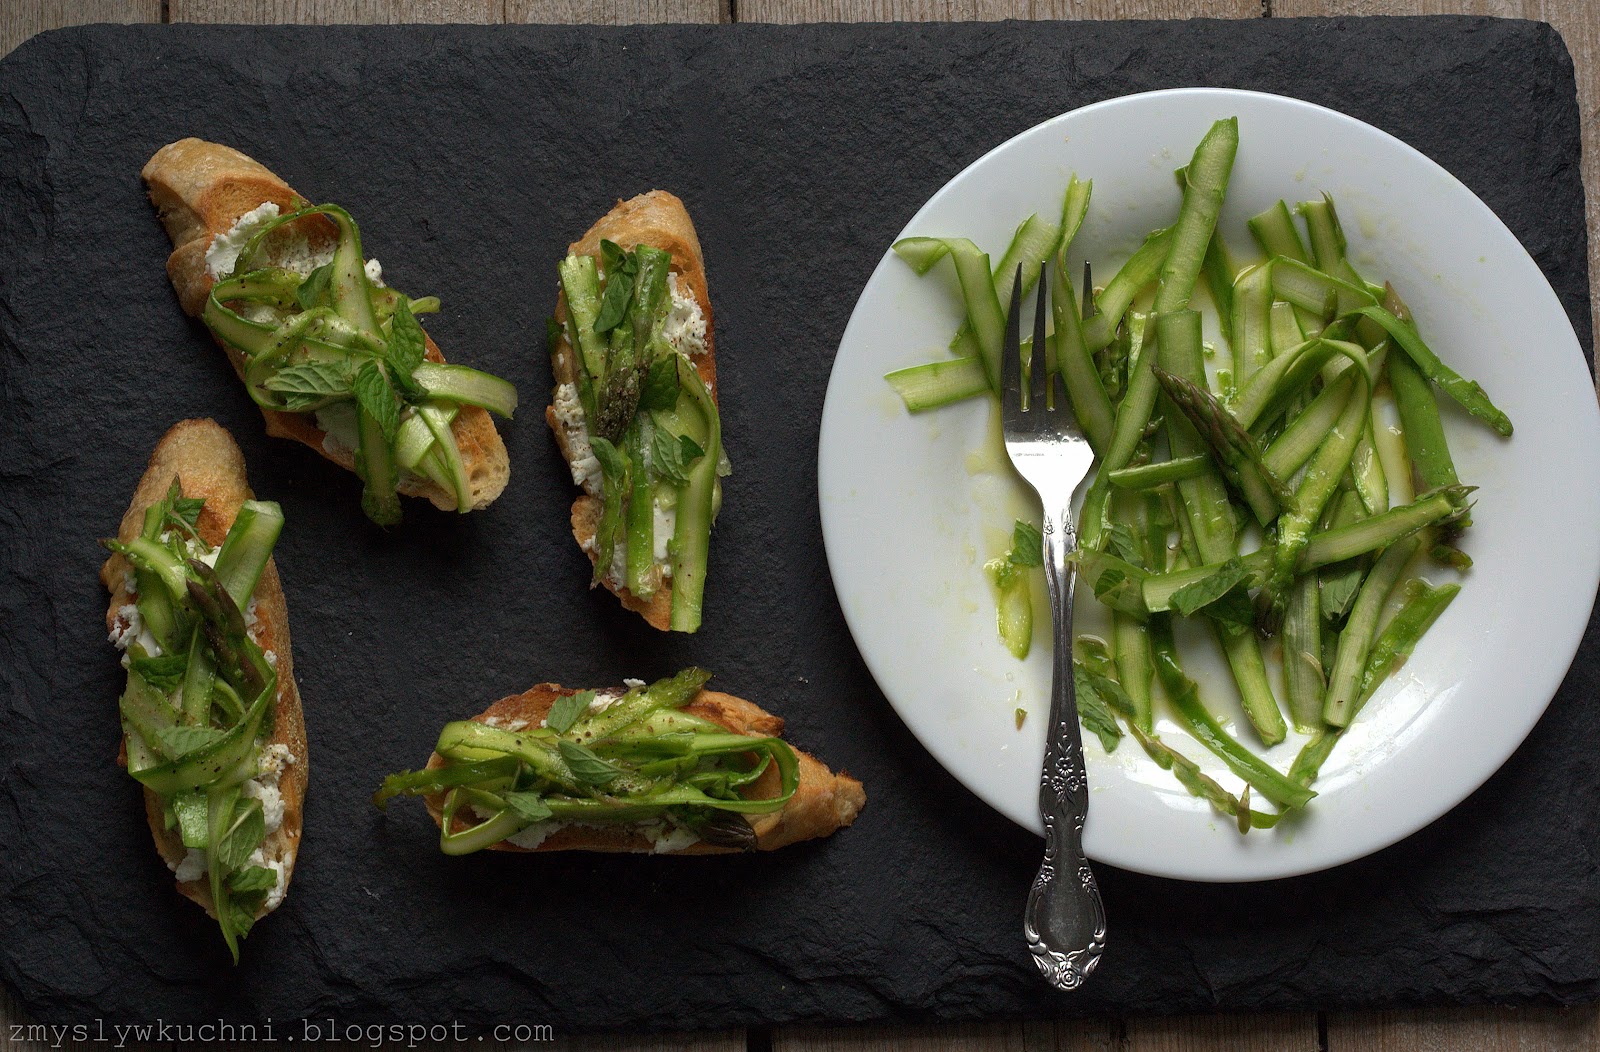
Grilled bread with goats' cheese & raw asparagus


I don't know if you are going to believe me, but the weather has been dreadful for the last few weeks. It seems that we already had two weeks of summer in March and now we are getting ready for autumn...
 
 This is quite typical for Brits to start a conversation with the weather theme. I am Polish, have been living in Britain for more than six years and I can honestly say I think this is not only the most neutral way to start a conversation, I genuinly believe that this is something that gives you a lot opportunieties to talk about. Especially here in North Yorksire it is very unpredictible. Why not to talk about it? 

In weather like this I cetrainly deserve more comforting dish such as hearty stew, but I guess I try to put some spells on the weather and bring the high temperatures back.


Serves 2 

4 green asparagus spears, wooden bottoms removed
2 tbsp good extra virgin olive
1 tsp lemon juice
salt
freshly ground black pepper
few slices of bread
about 40g soft goats' cheese
few fresh leaves of mint and oregano, roughly chopped

Using a veg peeler slice the asparagus lenghtwise. Add some salt, olive oil and lemon juice, mix well and leave it to marinate for about 15 minutes. 

Toast or grill the bread. Spread some cheese over the grilled bread, top with some marnated asparagus, sprinkle with some pepper and fresh mint and oregano.

Monday, 23 April 2012

Cannellini, cucumber & dill salad


I am back! I am back with some new cookbooks. I did not cook at all during my break in Poland; I was spoiled by my family and friends, they have cooked for me.

I was also given some fantastic cook books such as “Nepal cook book” from friends who came back from Nepal not long time ago and Magdalena from Tasty Colours blog (that I highly recommend if you are interested in Polish cuisine – it is in English!) gave me Julia Child’s book – an absolute classic, I am sorry but I am not sure about the English title, it is general cook book with many classic recipes ant useful tips.

I also bought myself chunky cookbook about Polish regional cuisines. It has over 1000 recipes from different regions and I think this will help me to get more ideas about versatile Polish cuisine.

I found today’s recipe in this book, but I have changed it slightly. As much as I love garlic I thought it was rather mad to use whole garlic bulb in raw salad, also in my opinion the dressing based on the water was rather strange idea to go with a cucumber salad, as this is quite water vegetable already. So this is my take on this salad that suppose to come from Warmian-Masurian (PL Mazury i Warmia) region (North East, beautiful lake district). 


Serves 3-4

300g white beans, soaked and cooked (I used cannellini)  
1 cucumber, peeled and diced  
2 tbsp fresh dill, chopped
1 large garlic clove, peeled  
3 tbsp extra virgin olive oil  
½ level tsp of salt  
freshly ground black pepper

Mix the beans, cucumber and dill in a large bowl.

Roughly slice the garlic and place in the mortar with the salt. Crush using a pestle until smooth then add the olive oil and mix well. Add the dressing to the salad and mix well. Season with some pepper. Chill before serving.


Wednesday, 4 April 2012

Smoked salmon parcels with caper cream cheese


This is my last post before Easter and my trip to Poland. I have some time off, so there will be a short break on my blog. Please do not forget about me, because like Terminator "I'll be back" and it will be fab time to go back to cooking and blogging - asparagus in season. Shall I say "I'll be back with a bunch of asparagus"?

Before I go I would like to show you something that looks nice and I think this is very interesting way of presenting cream cheese. I found the idea of wrapping cream cheese in smoked salmon in some ancient "Dales Life" magazine (recipe by Merry Berry) and originally the cooked and chopped prawns were used for a fillingalong with cheese. Since I tried the original one I went through several variations and all of them seemed fine i.e. chopped smoked salmon, gherkins, various herbs and today I will show you one with capers.

This is very rich dish so do not be tempted to serve one to one person only. In my opinion one parcel served with some crusty bread or toast or even good quality crackers or oat cakes should serve up to 3 people as a snack or starter. I cut each in six and let guest help themselves.

I wish you happy Easter and talk to you when I get back! 


Makes 2
 
4 large slices of smoked salmon 
about 150g cream cheese
1 tbsp salted capers, rinsed and chopped 
2 tbsp of fresh dill, chopped
zest of one lemon
1 tsp of lemon juice 
salt (optional, capers are salty)
freshly ground black pepper
some salad leaves and lemon wedges to serve 
springs of fresh dill to garnish (optional)


Mix the cream cheese with lemon zest and juice, capers, dill and freshly ground black pepper.

Line two soufflé dishes with some cling film making sure it is overlapping the dishes. Next line the dishes with smoked salmon slices in the same way - some of the fish should overlap each dish. Next add the cheese to the dishes and gently press with a spatula or spoon. Cover with the overlapping smoked salmonand then with the cling film and place in the fridge. Ideally overnight, but 2 hours will do. I also try to press them with some weight while they are resting.

Remove from the fridge, unwrap the foil and gently place upside down onto a serving plate. Garnish with some salad leaves, lemon wedges and serve.

Monday, 26 March 2012

Beetroot & parsnip raw salad with pineapple dressing


I mentioned once or twice that I live vegan food very much. I do not get too excited about the whole philosophy of veganism, I do not find eggs or butter substitutes especially in the desserts very tasty. In my kitchen vegan dishes are quite common (most soups!) and when you think about raw salads, veggie side dishes most of them are vegan.  

I have to admit though that I am not very good in making raw salads. I remember eating them a lot as a child, my Mum is very good at making them, I still cannot get them as perfect. Due to the strong memories of the raw salads I ate as a child I decided to go for something completely new.  I found this recipe and I thought it is completely crazy. And this means I have to try it asap!

This recipe comes form excellent book called "Veganomicon. The Ultimate Vegan Cookbook" (Isa Chandra Moscowitz, Terry Hope Romero) and in the future I think I will add a splash of lime juice to the dressing, because I think this would make it even better. I used freshly juiced pineapple, because we do not buy ready juices – we have our own juicer and make juices as we go. I could not see any point in getting ready bought expensive juice (yes, 100% natural are expensive) and not drinking most of it when I only needed little for a dressing, so I bought fresh pineapple and juiced it.  

Enjoy this most freaky crazy (in a good way!) raw salad.

Serves 3-4

2 large parsnips, peeled (about 220g)
5 small beetroots, peeled (about ok. 230g)
1/3 cup of chopped fresh mint

Dressing

1 cup pineapple juice  
¼ cup red wine vinegar  
1/5 cup of oil (I used rapeseed, originally it was grape oil)
1 tbsp agava syrup or maple syrup
½ tsp salt  
1 small garlic clove, peeled and finely grated

To prepare the dressing mix all the ingredients in a large bowl and set aside. 

Using a food processor shred the vegetables. You really need to use food processor here, first of all the vegetables will be nicely shredded, it will take one minute only and remember – the beets stain quite a lot so when you shred them using grater your kitchen will end up looking like a shower in “Psycho” film by Hitchcock.

Add the shredded vegetables to the bowl with the dressing and leave them to macerate for about 15 minutes.  

Next add the mint, mix well and chill slightly before serving.

Wednesday, 21 March 2012

Onion & sage farinata with peperonata


This is one of the recipes I have found in "For the love of Food" by Denis Cotter, one of the most talented vegetarian chefs. I have been looking at some recipes for a long time but only recently I decided to actually make one of them. Some of them are quite complicated, but the dishes look gorgeous. I will try to write a separate post about the book itself some time. 

I read that farinata is Italian street food – a pancake made with chickpea flour with some topping. I have never tried it, so I am would be most happy to read your comments on how the real farinata should be. This is only Denis’ take on this dish. 

I could not find any information how big the pan used for this dish was, so I used my large 28cm pan and doubled the amount of the butter. It came out about 1cm high – so was started in the book with the original quantities, so he must used smaller pan.  

This has very specific favour. Its consistency is similar to polenta, yet it has slightly fermented flavour. You suppose to leave the batter for at least 2 hours, and the longer you will leave it the more sour and yeasty flavour it will get. I left mine for longer than I expected (had to leave home for a while, not planned at all…) so it rested for 18 hours and had very yeasty flavour. It doesn’t bother me, but I can imagine it can put some people off. Next time I will leave it for about 6-8 hours in room temperature.  

It is tasty when warm, but cooled down was still very good; I think this would make lovely finger food when cut into small pieces.  Denis Cotter suggested serving this farinata with peperonata – it was very good indeed! 

 
For farinata

Serves 2-4 

200g gram flour  
about 500ml water
6 tbsp olive oil
1 tsp salt  
2 large, red onions, peeled, halved and sliced  
6 sage leaves


For peperonata

2 tbsp olive oil
4 garlic cloves, peeled and roughly chopped
1 fresh red chilli, deseeded and finely sliced
2 large red bell peppers, deseeded and sliced into 1cm strips  
20 black olives, pitted, halved
2 tsp salted capers, rinsed thoroughly under running water 

First prepare the batter. Mix the chickpea flour with water until smooth, cover with a cloth and leave it to rest for at least 2 hours. Next remove the froth on the top and add 2 tbsp olive oil and salt. Mix well and heat the oven to 230C. 

Now prepare the peperonata. Heat the pan and add 2 tbsp olive oil. Next add the chilli, garlic and fry for about 1 minute. Add the peppers, capers, olives and reduce the heat. Cover and simmer for about 20 minutes, stirring occasionally. 

Heat the frying pan that you can use in the oven and add 2 tbsp olive oil. Next add the onions and fry over a medium heat until soft. Remove from a pan and set aside. Wipe the pan with some paper towel. Add 1 tbsp of olive oil and fry the sage leaves until crispy. Remove from a pan and set aside. Next add the remaining 1 tbsp olive oil to the pan and when it is hot pour the batter into the pan.  Place immediately in hot oven. 

Check the farinata after about 3-4 minutes – the bottom should be firm already. Then add the onion and crush the sage leaves in your fingers on the top. Put back in the oven and bake for about 8-10 minutes, I used frill for last 2 minutes. 

Remove from the oven and accordingly to Denis you should be able to slide this pancake onto a chopping board. Well… This seemed impossible with mine, to I turned this upside down onto a chopping board lined with some paper and then again – upside down onto another chopping board. 

Cut into wedges and serve with some warm peperonata on the side.

Saturday, 17 March 2012

Beet pickled stuffed eggs (and how to boil hard boiled egg)


I am a huge fan of eggs and egg based meals. What I do not like and run away screaming when I see it is this disgusting grey ring around the yolk. “Can you cook hard boiled eggs?” seems like a silly question to ask yourself, even worst to ask somebody else.  However I found out that you can boil hard boiled egg for too long or too rapidly and it turns out not nice at all. I read Roux brothers and you have to admit the eggs have no secrets for them; I also read some blogs and realised that there are probably two best ways to cook hard boiled egg. 

First. Suitable for those cooking on the hobs. 

Put the eggs in a pan and cover with cold water. Add some salt and place on the hob. Bring to the boil and then immediately turn the heat off. Leave on the hob for 10 minutes. As soon 10 minutes go off, place the eggs under cold running water, cover with cold water and let them cool down. 

Second way. 

Place the egg into boiling, salted water and when it starts to boil again, set the timer for 6 minutes. Again, after this time, remove from a hot water, cool down in cold water. 

I prefer first way (longer, but less energy is used). 

So when you have your perfect hard boiled egg you can dress it pink. I love this colour, and idea of pickling eggs seems to be quite popular in UK and USA, however this beet pickled eggs are so much prettier! And they taste nicer. You can obviously make your own brine by cooking some fresh beets in vinegar with spices and sugar, or alternatively you can take a shortcut and use ready brine from shop – bough pickled beets. 

I took shortcut. These eggs are fantastic! They would look gorgeous on Easter table and should be very good as a finger food.


3 hard boiled eggs, peeled  
about 2  cups of brine from pickled beetroots
about 1/3 cup of red wine vinegar
about ¼ cup of soft brown sugar
tsp of whole black peppercorns

Mix the brine, vinegar, sugar and peppercorn in a large jar. Lower the eggs into it, seal and keep in the fridge. The longer you will keep them the more intense the colours and pickled flavour will be. You can keep them up to 3 days, I kept mine 14 hours. 

Carefully remove the eggs from a brine and set on a paper kitchen towel. Then cut them in half and scoop out the yolks.

Prepare the filling.

yolks from pickled eggs
1 tbsp of mayonnaise
½ tsp English mustard
1 tsp white wine vinegar
1 tbsp olive oil (I used EV)
2 pinches of chilli powder
1 pinch of turmeric
salt
freshly ground black pepper

Mix all the above and working with a fork mash them very finely, until smooth. Place in a piping bag and fill the pickled egg halves.

Sprinkle with some chives before serving.

Thursday, 15 March 2012

Mushroom & walnut pâté

  
Do you think about Easter already? I do. It does have quite strong religious character in Poland and I am not bothered about this, but I always manage to get some time off and this year I will spend this time with my family and friends in Poland. Therefore I look forward Easter and I cannot wait to get on a plane and go back home for few days. 

Today I would like to show you one of the recipes that can be quite useful when you have friends around and want to make light brunch, or just have something to snack. I find many people not knowing what tasty food to prepare when they have vegans or vegetarians for a meal. This is one of these things that will wow anybody, even committed meat eaters.  

I wonder how should I name it, but really a pâté seems to be suitable one (rather than dip).  The recipe below inspired by one from "Veganomicon. The Ultimate Vegan Cookbook" (Isa Chandra Moscowitz, Terry Hope Romero).

Makes about 2 cups 

about 5 tbsp olive oil
1 large onion, peeled and diced
3 garlic cloves, peeled and chopped  
leaves picked from 2-3 springs of fresh thyme
1 tsp of chopped fresh parsley  
about 400g mushrooms, roughly chopped (I used brown)
1 cup walnuts, lightly toasted in a dry pan
1 cup of cooked beans (I used cannellini)
2 tsp balsamic vinegar  
salt
freshly ground black pepper


Heat a frying pan over a medium heat and add the onion. Fry for about 10 minutes until soft, but not browned. Add the garlic, thyme, parsley and fry for about 3 minutes. Next add the mushrooms, season with salt and let them cook until softened. Remove from a heat and set aside. Let them cool down slightly. 

Place the walnuts in a food processor and process until very fine. 

Next add the beans and the mushrooms with all the juices from the pan. Add vinegar, quite a lot of pepper and whiz. Add the remaining 3 tbsp of olive oil while whizzing. 

Season with some salt and pepper if required and place the pate in an airtight container. Chill before serving. It tastes so much better next day, when the flavours have chance to mellow.