Showing posts with label breakfast. Show all posts

Sunday, 9 September 2012

Breakfast. Eggs, tomatoes, bread.


Good morning!

Eggs are such a classic thing for breakfast, aren't they? Bread first thing in the morning isn't something unusual too. Still this dish left me speechless. Yes, another recipe from my new cook book. Enjoy this lovely breakfast.


Serves 2


250g ripe tomatoes (cherry or regular ones)
3 tbsp olive oil
2-3 slices of your favourite bread 
2 eggs
salt
freshly ground black pepper


Heat the oven to 180 C. 

Line a baking tray with some baking paper. 

If you are using large tomatoes, cut them into wedges. I cut mine into halves and then each half into 3 pieces. If using cherry tomatoes, just cut them in half. Place onto a baking tray, drizzle with 1 tbsp olive oil and season with salt and pepper. Place in the oven and bake for about 20 minutes, until they soften and start to caramelised on the edges.

Meanwhile tear or cut the bread into bite size pieces, place in a bowl and drizzle with the remaining olive oil. Season with salt and pepper and toss to coat. Set aside.

After about 20 minutes remove the tomatoes from the oven and add the bread chunks. Return to the oven for about 7 minutes, until the bread starts to turn golden and crisp.

Then remove the dish from the oven and using a spatula or spoon form 2 hollows in amongst the tomatoes and bread. Break an egg into each hollow and return to the oven for max. 5 minutes. Whites should be set, but yolks still runny.

Remove from the oven, grind some salt and pepper and serve immediately.

Plus one? Add roughly torn chunks of mozzarella at the same time as eggs, letting them melt into the bread.

Enjoy it and have a lovely day!

Sunday, 2 September 2012

Sourdough bread, olive oil, honey


I have a feeling not many of you have tried this combination, even I am sure most of you have all the ingredients at home all the time.

On Tuesday I have received bran new book called "Hugh's Three Good Things" by Hugh Fearnley-Whittingstall. I am going to write a review shortly, but first let me show you few recipes from this book that I have already tried. 

This was my Saturday's breakfast. Crunchy, sweet, salty and little bit sour.


few slices of good quality bread (preferably sourdough, I used wheat sourdough with a hint of rosemary)
good quality extra virgin olive oil (I used olive oil from Ginestra, with low acidity and scent of artichokes)
coarse sea salt or flaked salt
honey


Toast or grill bread to your liking.

Drizzle fairly generously with olive oil and leave for a minute to soak in.

Sprinkle with some salt.

Drizzle with some honey.


That's it. So little and so much. I died and found myself in heaven.

Hope you'll enjoy it, have a lovely Sunday!

Monday, 6 August 2012

My everyday bread. From starter to loaf.


I don't  consider myself a bread expert by no means but I finally decided to write about my everyday bread after I had some many requests from my guests. Most of them asked if recipe for the bread I served them can be found on my blog. So here it is. 

This is one of my easiest sourdough breads, requires little effort but little patience and time. I bake this bread at least three times a week and quite often I use different types of flour, just stick to the general quantities. Also I use a bread loaf that tin - a kind of spring form - the side bit comes off and bread can be easily lifted from a bottom when it is still hot.

How to make it? First you have to prepare the sour starter. This is a key to good sourdough bread and it’s worth taking some time to get it right. The older the starter is, the more regularly you feed it the stronger it gets. For some time I have been using rye starter only, but you can make it using wholemeal wheat flout too. I personally prefer the smell and taste of the bread made with rye starter. Also it is quite strong so it will lift those breads made with heavier types of flour such as wholemeal rye flour (dark, dense, sour breads).

Most of the bread books and experts recommend to measure the ingredients for sour starter. I don't think this is as much important, as long as you stick roughly to the proportions (similar amount of water to flour).  However if you are beginner I think it will be better if you measure the exact quantities. Looking after your starter on a regular basis will give you more experience and teach you that using a kitchen scale in not always necessary.

I would say that 5 days old starter is far too young to lift heave dough made with rye flour, so you may as well use little yeast or for a start make a white loaf. This is not always the case, as you have to remember that starter is very individual and living thing - some of then can be quite strong from a start and up for a challenge! 

Rye sour starter (as advised by Jeffrey Hamelman)

Day 1

100g wholemeal rye flour
100g water (natural, untreated, in room temperature)

Mix the water with flour in glass or plastic container. Cover with cloth and leave it in warm place (ideally 25C) for 24 hours.

Day 2

half of the mixture from day 1
50g wholemeal rye flour
50g water

Mix all of the above in glass or plastic container. Cover with cloth and leave it in warm place for 24 hours.

Day 3

100g of the mixture from day 2
100g wholemeal rye flour
100g water

Mix all of the above in glass or plastic container. Cover with cloth and leave it in warm place for 12 hours.

The same day, 12 hours later

100g of the mixture from earlier that day
100g wholemeal rye flour
100g water

Mix all of the above in glass or plastic container. Cover with cloth and leave it in warm place for 12 hours.

Day 4

100g of the mixture from earlier that day
100g wholemeal rye flour
100g water

Mix all of the above in glass or plastic container. Cover with cloth and leave it in warm place for 12 hours.

The same day, 12 hours later

100g of the mixture from earlier that day
100g wholemeal rye flour
100g water

Mix all of the above in glass or plastic container. Cover with cloth and leave it in warm place for 12 hours.

On day 5 starter should be ready to use. Store it refrigerated in airtight container and you have to feed it at least every two weeks. To do so remove from a fridge, bring to the room temperature and add the same amount of fresh water and flour - I don't use scale anymore, just add handful of flour and some water to bring it to the double cream like consistency. Leave it in room temperature for 4-8 hours, some young starters may require up to 12 hours to work. After this time it should start to work - bubble and lift little bit - it means it is active and ready to use. I feed my starter every 2-3 days, because I bake my bread quite often, but when I go on holiday I leave it in a fridge for 2-3 weeks and feed it immediately when I come back home. If you don't feed the starter it will die. (or shall I say go off)

I have been making this bread for a long time now and in last few months I learned how to make it without measuring the ingredients using a scale... because mine got broken and I never bought a new one since. You will learn with time how dough should look like, how much water require different types of flour and I am sure you will be liberated from using kitchen scales too.

I am big fan of using a stand mixer. Personally I think Kitchen Aid is great to do this job, especially when it comes to heavy rye dough, but any mixer with a hook will be good, also you can use your own hands - this will require a bit of strength and some more time. I use mixer because I never was a big fan of preparing the dough by hand, also I like to have spare time to do other things while the dough is getting ready. This is my personal choice, I know some people like to work with the dough themselves.

And one more thing I should probably mention. I make most of my breads in two (or three) distinct stages – first by incubating the starter and then adding this to the proper bread dough. The incubation is important because it allows the starter to grow and multiply in fresh flour and water and create what I call the sponge - this helps to rise the dough into a loaf.

Easy mixed sourdough bread

Phase one - the sponge

about 100g wholemeal wheat, or wholemeal spelt or wholemeal rye flour
5 tbsp active starter
about 100g water

Mix all of the above in a plastic bowl, cover with clean cloth  and leave it in room temperature for about 10-16 hours. It should lift little bit and become airy.

 Phase two - the loaf 

about 150g wholemeal wheat, or wholemeal spelt or wholemeal rye flour
about 350g white strong (bread) flour
about 300-350g water (you have to adjust this - different types of flour will require different amount of water)
7-10g salt
optionally - few tbsp of seeds such as linseed, sunflower or pumpkin seeds

Place the flour on a bowl, add the sponge, seeds and about half of the water, then start to mix. When mixing add the remaining water, not all at once - you may have to adjust the amount of water. The dough should be quite flexible, bit sticky, not too dry but not too wet - you should be able to lift it with wet hands and stretch it a bit. When using mixer it should take about 7 minut, by hands - 10 to 12 minutes.

Next turn the mixer off and leave the dough in the bowl, sprinkle with salt and leave to rest for about 10 minutes. Next knead the dough another 3 minutes using mixer, or 5 minutes if using hands. 

Oil the loaf tin with little sunflower (or other neutral oil) and sprinkle with some oat bran - this will help to develop crust and help to remove the loaf from a tin after baking. Remove the dough from a bowl with your wet hands and stretch, then fold like an envelope. Place seal side down in prepared tin. Optionally sprinkle with some more oat bran, cover with clean cloth and leave it for about 8-12 hours in room temperature. (my starter is mature and strong, and on hot day it only needs about 5 hours to rise the dough).

When bread is risen heat the oven to 250 C. Place the tin in oven and immediately spray with some water (I use flower spray). Bake for about 5 minutes and then reduce the temperature to 220 C and bake for further 30 minutes. If the crust is getting too dark cover the loaf with some kitchen foil.

Remove form the oven and leave it to cool down for few minutes, then remove from a tin and leave it to cool down completely - on a wire rack. Tip - you know the bread is ready when it sounds hollow when tapped on the bottom.

Enjoy your homemade sourdough loaf!

Monday, 7 May 2012

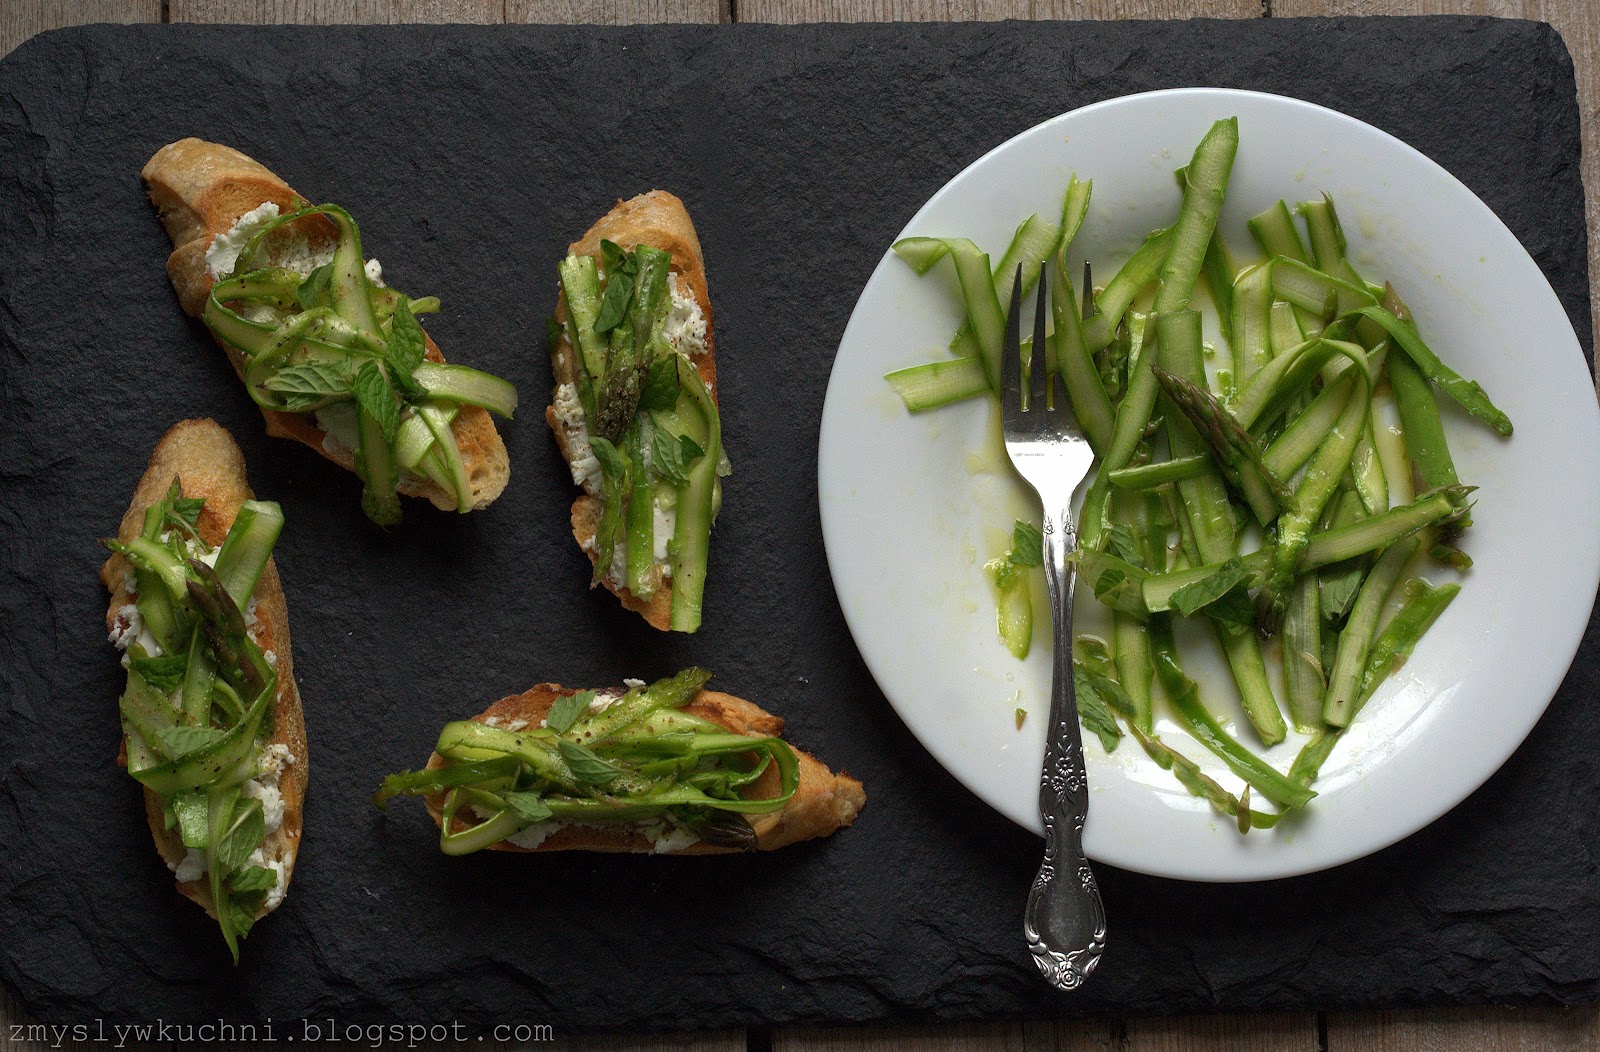
Grilled bread with goats' cheese & raw asparagus


I don't know if you are going to believe me, but the weather has been dreadful for the last few weeks. It seems that we already had two weeks of summer in March and now we are getting ready for autumn...
 
 This is quite typical for Brits to start a conversation with the weather theme. I am Polish, have been living in Britain for more than six years and I can honestly say I think this is not only the most neutral way to start a conversation, I genuinly believe that this is something that gives you a lot opportunieties to talk about. Especially here in North Yorksire it is very unpredictible. Why not to talk about it? 

In weather like this I cetrainly deserve more comforting dish such as hearty stew, but I guess I try to put some spells on the weather and bring the high temperatures back.


Serves 2 

4 green asparagus spears, wooden bottoms removed
2 tbsp good extra virgin olive
1 tsp lemon juice
salt
freshly ground black pepper
few slices of bread
about 40g soft goats' cheese
few fresh leaves of mint and oregano, roughly chopped

Using a veg peeler slice the asparagus lenghtwise. Add some salt, olive oil and lemon juice, mix well and leave it to marinate for about 15 minutes. 

Toast or grill the bread. Spread some cheese over the grilled bread, top with some marnated asparagus, sprinkle with some pepper and fresh mint and oregano.

Friday, 4 May 2012

The perfect granola (smells like apple pie)

I realise there are many recipes for granola and selection in the shops is quite wide however I will give you this recipe, perhaps someone will be inspired and make homemade granola, this perfect one.  Some of those I have made before were too sweet, some of the shop bought contain ingredients that I try to avoid in my diet such as glucose syrup very common in mass produced food, responsible for diabetics and gaining weight in large number of Americans and vegetable oil that quite often happens to be palm oil - quite controversial - when produced causes deforestation in Indonesia, Malaysia and Papua New Guinea. If I can avoid it why shouldn't I? I make my own granola. 

House smells like apple pie, in the morning I have quick, healthy and filling breakfast ready within seconds and it makes me really happy first thing in the morning, specially when I do not have a time to cook anything else. Only my cat is not very happy when I take him off my knees every 10 minutes to stir the granola in the oven.


1½ cup rolled oats
1½ cup spelt flakes
handful of almonds, roughly chopped
2 tbsp linseed
1 tbsp sesame seeds
3 tbsp sunflower seeds
3 tbsp pumpkin seeds
about 300ml natural apple juice (preferably freshly pressed, or organic natural, cloudy shop bought juice)
5 tbsp vegetable oil such as sunflower oil, grape seed oil or rapeseed oil 
2 tbsp honey
4 tbsp agave syrup (I used raw)
1 tbsp cinnamon
pinch of ground ginger 
pinch of salt
2 handfuls of currants

Heat the oven to 140 C (fan).

In a large bowl mix the oats, spelt flakes, almonds, sesame seeds, linseed, sunflower seeds, pumpkin seeds, cinnamon, ginger and salt.

In separate bowl mix oil, juice, honey and agave syrup.

Mix dry ingredients with the wet ones thoroughly and place on the baking trays lined with baking paper. Place in the oven.  

Bake the granola for about 1 to 1 ¼ hours, depends on how thin the layer of the granola is – the thicker it is the longer it will take to bake it.

Stir granola every 10 minutes, so it bakes thoroughly and evenly. After 1 hour open the oven, turn it off and leave granola to cool down slightly. Next add the currants, mix well and leave it to cool down completely.

Store granola in an airtight container. I love it with hot or cold milk, natural yoghurt or just on its own as a snack. I the summer I love it with seasonal fruits such as strawberries, blueberries or raspberries.

Wednesday, 4 April 2012

Smoked salmon parcels with caper cream cheese


This is my last post before Easter and my trip to Poland. I have some time off, so there will be a short break on my blog. Please do not forget about me, because like Terminator "I'll be back" and it will be fab time to go back to cooking and blogging - asparagus in season. Shall I say "I'll be back with a bunch of asparagus"?

Before I go I would like to show you something that looks nice and I think this is very interesting way of presenting cream cheese. I found the idea of wrapping cream cheese in smoked salmon in some ancient "Dales Life" magazine (recipe by Merry Berry) and originally the cooked and chopped prawns were used for a fillingalong with cheese. Since I tried the original one I went through several variations and all of them seemed fine i.e. chopped smoked salmon, gherkins, various herbs and today I will show you one with capers.

This is very rich dish so do not be tempted to serve one to one person only. In my opinion one parcel served with some crusty bread or toast or even good quality crackers or oat cakes should serve up to 3 people as a snack or starter. I cut each in six and let guest help themselves.

I wish you happy Easter and talk to you when I get back! 


Makes 2
 
4 large slices of smoked salmon 
about 150g cream cheese
1 tbsp salted capers, rinsed and chopped 
2 tbsp of fresh dill, chopped
zest of one lemon
1 tsp of lemon juice 
salt (optional, capers are salty)
freshly ground black pepper
some salad leaves and lemon wedges to serve 
springs of fresh dill to garnish (optional)


Mix the cream cheese with lemon zest and juice, capers, dill and freshly ground black pepper.

Line two soufflé dishes with some cling film making sure it is overlapping the dishes. Next line the dishes with smoked salmon slices in the same way - some of the fish should overlap each dish. Next add the cheese to the dishes and gently press with a spatula or spoon. Cover with the overlapping smoked salmonand then with the cling film and place in the fridge. Ideally overnight, but 2 hours will do. I also try to press them with some weight while they are resting.

Remove from the fridge, unwrap the foil and gently place upside down onto a serving plate. Garnish with some salad leaves, lemon wedges and serve.

Saturday, 26 November 2011

Apple & cranberry pancakes with spiced butter


I was really keen to cook those pancakes since I first saw them in December’s “Good Food” issue. I love the aroma and the taste of spices such as cinnamon, cardamom, nutmeg, pepper. In many Polish homes a gingerbread is served during the Christmas and the idea of having something for a breakfast with this hint of Christmassy was very tempting. Originally this was served with a cinnamon butter but I decided to go for the whole range of spices and use mixed spice. Also they recommend peeling the apple; I personally think that this would be such a shame to get rid of the apple skin. I also did not weight the cranberries, just added a good handful.  Don’t be surprised with the idea of salted butter being used along the sugar and spices – it goes amazingly good with the sour cranberries and the sweet syrup. 

This was one of the best things I ever had for my breakfast. I would highly recommend this for a breakfast in cold winter morning especially when you are planning a walk – it gives a real kick! We had it twice already and still can’t stop thinking about having some more.  

Serves 2-3

For the pancakes:

150g self raising flour
half tsp bicarbonate soda
pinch of salt
1 egg, beaten
about 140ml buttermilk
2 tbsp milk
about 40g melted butter
1 eating apple, cored and coarsely grated
handful of dried cranberries

more butter for frying
maple syrup for serving

Spiced butter:

about 40g salted butter
1 tbsp mixed spice
1 tsp caster sugar

To make the spiced butter roughly cut the butter with a knife sprinkle with mixed spice and sugar, chop little bit further so all the ingredients are mixed well. Form a sausage shape and wrap in a piece of paper, store in a fridge.

For the pancakes mix the flour with the soda and a pinch of salt in a bowl. Make a well in the centre and gradually whisk in the egg (I used fork), followed by milk, buttermilk and melted butter. Once the mixture is smooth and there are no signs of dry flour add the grated apple and cranberries.

Melt some butter in a frying pan and when hot ladle small amount of batter to form 3-4 pancakes, depending on the size of your pan.  Cook for about 3 minutes until golden and turn over and fry for 2 more minutes, or until golden.

To serve stack pancakes on a warm plate, add good knob of spiced butter on the top and drizzle with maple syrup.  And I swear - now when I am writing about this my mouth waters.

Tuesday, 20 September 2011

Cinnamon & Sultana Swirl Bread


To fight first signs of autumn depression it is good to have something tasty for breakfast on really wet and dull morning. I have made this bread for a first time and it turned out to be too much for two if us, therefore I decided to share this little ray of sunshine with David and his wife who live nearby. They appreciate good food and I thought it would be nice to have a slice of this bread with hot tea when he gets back from a shooting day. I love to share these little nice things with other people.


I found this recipe on The Kitchn website and I have changed it slightly. I used brown sugar instead of the white, sultanas instead of raisins and soaked them in the dessert wine instead of water.


Makes 2 loaves

Dough:

1 cup sultanas
some dessert wine, enough to cover the sultanas 
1 cup warm water
1 tablespoon active dry yeast
1 cup milk
1/4 cup unsalted butter, melted
2 teaspoons salt
6 cups all-purpose flour


Filling:

3/4 cup brown sugar
2 tablespoons cinnamon
1 egg beaten with 2 teaspoons warm water


Put the raisins in a small bowl and cover them with warm wine (or water if you follow the original recipe). Let the raisins plump for at least 10 minutes. Drain and set aside to dry.

Pour a cup of water into the bowl of a standing mixer or large mixing bowl. Sprinkle the yeast over top. Give it a few minutes, then stir to dissolve the yeast into the water. Stir the milk, melted butter, and salt into the water. Gradually add the flour, one tablspoon at time and mi to form a dough. Knead in your mixer on low speed with a dough hook or knead by hand for 8-10 minutes to form a smooth, slightly tacky dough. The dough is ready when it forms a ball without sagging and quickly springs back when poked.

Toss the raisins with a few tablespoons of flour to absorb any residual moisture from when they were plumped. With the mixer on gradually add them to the bowl and continue kneading until they are evenly distributed.

Next cover the dough and let it rise in a warm place until doubled in size, about an hour. Meanwhile, combine the sugar and cinnamon in a small bowl and beat together the egg and water in a second bowl.

Divide the dough into two pieces. Roll each part of the dough out on the working surface. It should be slightly less wide than your baking pan and as long as you can make it. The thinner the dough, the more layers of cinnamon swirl you'll end up with.

Brush the entire surface of the dough with egg wash, leaving about two inches clear at the top. Sprinkle generously with cinnamon and sugar and save little bit for later. Starting at the end closest to you, roll up the dough. When you get to the top, pinch the seam closed. Transfer the loaf to your loaf pan seam-side down.

Let the loaves rise 30-40 minutes, I left mine for 30 minutes and it was slighlty too short, the bread cracked on one side during the baking.

Brush the top with some of the remaining egg wash and sprinkle some of your remaining cinnamon sugar over the tops of the loaves as well. Bake in 180 C (fan) for 40 minutes until golden brown.

Remove the loaves from the pans and allow them to cool completely before slicing. I love to toast it and spred some butter over the bread. Baked loaves can also be frozen for up to three months.

Thursday, 12 May 2011

Pancakes with roasted rhubarb & vanilla crème fraîche


I had the idea of serving roasted rhubarb with crème fraîche and pancakes from some ancient “Good Food” issue. The idea was brilliant however I found this particular recipe inconsistent. Also there was no recipe for pancakes – or shall I say – perhaps I did not cut it out of the magazine. I did not worry too much because I know exactly how to make different types of pancakes.

Yesterday I had this overwhelming feeling that I have to eat a pancake. Luckily for my figure my common sense said “no” to making pancakes at 10 pm, so I went to bed. Next day I prepared one of the best pancakes I have ever had.

I decided to make bit thicker and sort of spongier pancakes, because they are great to wipe off the cream and juices. If you are not sure about this combination of sweet & sour rhubarb with sour-ish cream, please do not hesitate to try. It is unbelievable. What a great trio! I will definitely make it every year when rhubarb is in season.


Serves 4-6

Pancakes

3 eggs (I used duck eggs)
3 level tsp caster sugar
about 250ml milk
about 100ml sparking water
about 300ml plain flour
little butter for frying (I used ghee)
some icing sugar to finish off

Separate egg whites from yolks. Add sugar to the yolks and mix using hand mixer until well mixed and little fluffy. Add water, milk and flour and mix well again until combined.

Using hand mixer beat the egg whites until stiff. Then add whites to the milk and egg mixture and fold it gently. You want to preserve as much air as possible.

Place bowl in a bigger bowl filled with cold water – this suppose prevent the batter from collapsing.

Fry thin pancakes on both sides in a frying pan using butter.


Roasted rhubarb

6 rhubarb stalks, cut diagonally into 5-6cm pieces
2-3 pieces of stem ginger, sliced
2 tbsp honey
3 tbsp sugar
zest and juice of one lemon

Place all of the above in a pan and roast or boil over a low heat. I had oven preheated to roast something else, so I used oven ( 10-12 minutes, 180C).


Vanilla crème fraîche


200ml crème fraîche
seeds from one vanilla pod
2 tsp icing sugar

Mix well all the ingredients.

Serve warm pancakes drizzled with juices from roasted rhubarb, rhubarb on the side and a good dollop of crème fraîche. Optionally you can sprinkle them with some icing sugar.

Thursday, 20 January 2011

French toasts with orange syrup


Some people say that we should eat breakfast like a king, dinner like a noble and supper like a peasant. Do you remember emperor's omlette? This time I have made lovely breakfast which I think is worth at least royal table. However like a peasant I used stale bread. Filling, comforting, delicious twist on French toast.


Serves 2

6 slices of stale baguette
2 eggs
about 100ml milk
zest and juice of one large orange
2 heaped tbsp of caste sugar
few tbsp butter, for frying

Mix eggs with milk and orange zest and soak bread in this mixture, turning once after 2 minutes, so it soaks evenly.

Place sugar and orange juice in a pan and boil until syrupy.

Fry soaked bread in the butter, until golden on both sides. Place onto a plate and drizzle with orange syrup.

Wednesday, 7 July 2010

Pancakes with summer berries & maple syrup


It is nearly time to say goodbye to summer British strawberries that taste their best in May, June and July. These days, however, the British strawberry season extends from mid-April until mid-December, thanks to the use of plastic polytunnels, which provide the berries with a much longer growing season. However I prefer strawberries in the summer, because they taste much better in the summer months than later in the year. I have to indulge myself and somebody I love with tasty, fruity, summery and lazy weekend breakfast while I can.


Makes about 20

1.5 cup of milk
2 eggs, lightly beaten
2 cups of plain flour, sieved
3 level tsp of baking powder
3 tbsp of caster sugar
tsp of vanilla extract
pinch of salt
butter for frying

Mix the milk with eggs and vanilla extract and add al the dry ingredients, mix with hand mixer until smooth and set aside for about 15 minutes.

Fry the pancakes on the butter on both sides until golden.

Serve with summer berries such as strawberries and blueberries and maple syrup or honey.

Wednesday, 19 May 2010

Kaiserschmarrn - Emperor's omlette


Makes 2

5 eggs
5 level tbsp plain flour
2 tsp sugar
2 big handfuls sultanas
dark rum – enough to cover the sultanas
4 tbsp unsalted butter
1 tbsp icing sugar
pinch of salt

Soak the sultanas in the rum overnight.

Using a hand mixer beat the whites until not too stiff. In a separate bowl beat the egg yolks with sugar until pale, add flour and mix well. Add the sultanas together with rum (if there is any remaining) to the egg yolks and mix gently.

Next gently fold the egg whites into a mixture and make sure you not overwork it, because it should be light and fluffy.

Melt the butter in a pan then pour the egg mixture into the pan and fry it like an omelette over a low heat. After few minutes check with a spatula if the bottom is golden; if so, turn it upside down and fry on the other side for another minute.

Using a spatula tear the omelette into a pieces and fry until any remaining raw egg is gone.

Serve on the plate sprinkled with some icing sugar.

It also tastes good with fresh seasonal fruits or any fruit preserve.